
This is the article part 2 of the Scalable Node App in Scalable Cloud Infrastructure. If you are looking for part 1, please check it out here.
In the 2nd part of the article, we cover a bit more deep aspect in management and controlling of Node.js processes, sub-processes and control messages between master and worker processes – mostly in theoretical level but with generic examples as well.
Another topic will contain some host level considerations and optimizations; and how they support the fully scalable application infrastructure.
Master-Sub Process Architecture
To start with, let’s recap some of the principle in the master – sub process Node application communication. The concept in question here is utilizing the Node Cluster module. This functionality allows us to bypass the Node’s single-thread limitations with the hardware and allows us to use additional CPU cores for scaling up.
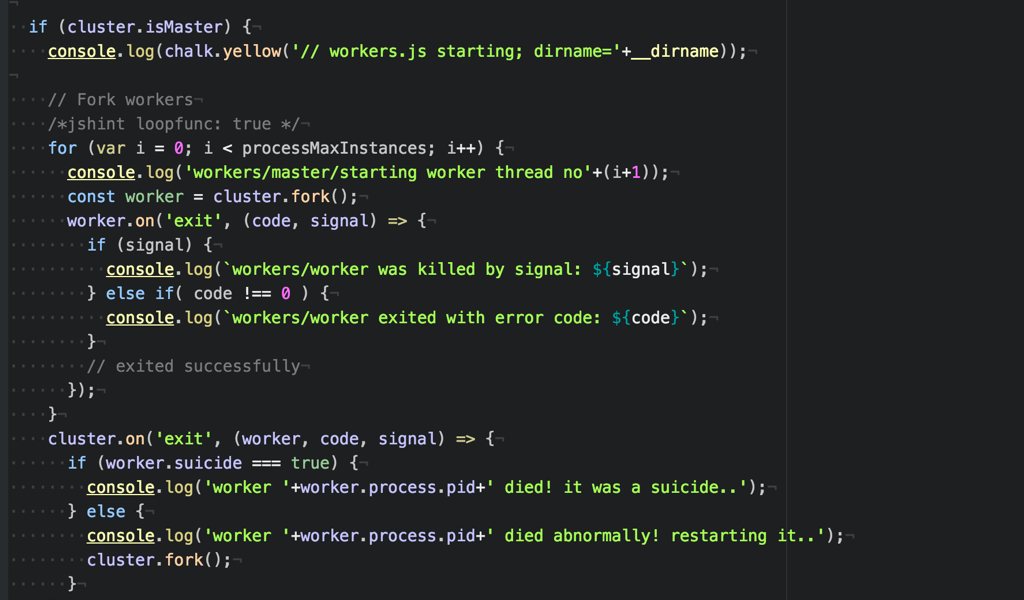
By using Node master and sub-processes, we allow processing of same activities in multiple threads utilizing the full capabilities of the underlying hardware whether it is physical or virtual environment hosting. For making the system smooth in co-operation, we need to establish communication between processes, such as sending control messages between master and sub-process. An example is seen below with a message from master to subprocess:
worker.send('Saludos from master!');
And an example from a subprocess (worker) to master:
process.send('Hello. This is a greeting from the worker: ' + process.pid);
It’s important to notice that message event callbacks are handled asynchronously and there isn’t any defined order of execution.
Another important design aspect is to keep master process simple and short; this minimizes risks and is in line with running master process all the time. The master will handle restarting and managing of worker sub-processes as necessary. Of course, we need to make sure that master process is running continuously, even some random problem would occur and crash the process: this can be done easily with Forever and ForeverService.
For good control of managing workers from master , we would need to implement proper handling of control messages from master to worker and vice versa; this ensure integrity and health of workers and allows proper shutdown of workers in terms of maintenance update etc.
It is okay to restart your workers by first sending them a controlled shutdown message; and then, if they did not safely terminate, forcing to kill them. This can be in event of upgrading your software without any downtime, e.g. running multiple workers in one host.
And example of this kind of control message could be following:
workers[workerId].send({type: 'shutdown', from: 'master'});
Then monitor for this message and safely shutdown the worker:
process.on('message', function(message) {
  if (message.type === 'shutdown') {
    process.exit(0);
  }
});
My recommendation would be to wrap this up with all workers and create necessary functions for handling different control messages from both master and workers perspective. And this would allow the monitoring of whether the worker was shutting down or do we have to force it with SIGKILL. Examples follow:
function doRestartWorkers() {
  var workerid, workerIds = [];
  for(workerid in cluster.workers) {
    workerIds.push(wid);
  }
  workerIds.forEach(function(wid) {
    cluster.workers[wid].send({
      text: 'shutdown',
      from: 'master'
    });
    setTimeout(function() {
      if(cluster.workers[workerid]) {
        cluster.workers[wid].kill('SIGKILL');
      }
    }, 5000);
  });
};
The example is getting the list of worker IDs of all the running workers from the cluster module and then sends shutdown control message. If the worker is still alive after 5 seconds, then forces the shutdown by sending SIGKILL system message.
Host Considerations
My normal Node application host is typically a set of following applications, programs and packages:
- Base image: Linux Debian 8.3 Jessie
- Backend platform with Node v4.x LTS
- No-SQL database with MongoDB v3.x
- Easy API routing with Express
- Front-end proxy with NGINX web server
- Process management with Forever and Forever-service
In addition, I am often running more than one Node application per server. These applications may be completely independent, server in different ports, or just support each other, providing supporting microservices.
Between these applications, I usually have main master application and then supporting processes doing often a lot of background processing and non-critical/non-real-time processing and activities. Such processes I set to lower priority with Linux NICE levels allowing me to maintain best effort with main master application on front-end level.
NGINX as a front-end
NGINX is a good HTTP operating system formodern web applications. It’s a high-performance, efficient HTTP processing engine handling desktop, mobile, and API traffic equally well before switching and routing each request to the correct service. I am usingNGINX to route traffic to my Node application processes and to do SSL transport decryption before it reaches the application level: this is done both for simplicity but added security and to minimize complexity thus allowing better scalability and performance.
NGINX is a well known as a high-performance load balancer, cache, and web server; and it is powering 40% of the busiest websites in the world. However, you still need to consider some optimizations with it and do some tuning.
![]()
Remember, that when trying out these recommendations and configurations, a good rule is to change one setting at a time, and set it back to the default value if the change does not improve the performance.
The Backlog Queue. This setting relate to connections and how they are queued. If you have a high rate of incoming connections and you are getting uneven levels of performance, then changing these settings can help:
- net.core.somaxconn – The maximum number of connections that can be queued for acceptance by Nginx. The default is often very low and that’s usually acceptable, but it can be worth increasing it if your website experiences heavy traffic
- net.core.netdev_max_backlog – The rate at which packets are buffered by the network card before being handed off to the CPU. Increasing the value can improve performance on machines with a high amount of bandwidth
File Descriptors. These are operating system resources used to represent connections and open files, among other things. NGINX can use up to two file descriptors per connection. For a system serving a large number of connections, the following settings might need to be adjusted:
- sys.fs.file_max – The system-wide limit for file descriptors
- nofile – The user file descriptor limit, set in the /etc/security/limits.conf file
Ephemeral Ports. When NGINX is acting as a proxy, each connection to an upstream server uses a temporary, or ephemeral, port. You might want to change these settings:
- net.ipv4.ip_local_port_range – The start and end of the range of port values. If you see that you are running out of ports, increase the range (common: 1024 to 65000)
- net.ipv4.tcp_fin_timeout – The time a port must be inactive before it can be reused for another connection. The default is often 60 seconds, but it’s usually safe to reduce it to 30, or even 15 seconds
NOTE on following configurations – some directives can impact on the performance. The following directives are usually safe for you to adjust on your own; I do not recommend that you change any of the other settings and also for any change, please be aware of any negative impacts may also occur.
Worker Processes. NGINX can run multiple worker processes, each capable of processing a large number of simultaneous connections. You can control the number of worker processes and how they handle connections with the following directives:
- worker_processes – The number of NGINX worker processes (the default is 1). In most cases, running one worker process per CPU core works well, and we recommend setting this directive to auto to achieve that. There are times when you may want to increase this number, such as when the worker processes have to do a lot of disk I/O
- worker_connections – The maximum number of connections that each worker process can handle simultaneously. The default is 512, but most systems have enough resources to support a larger number. The appropriate setting depends on the size of the server and the nature of the traffic, and can be discovered through testing. Finding maximum supported number by the core system can be done with ulimit:
ulimit -n
- use epoll – You can also use epoll, which is a scalable I/O event notification mechanism to trigger on events and make sure that I/O is utilized to the best of its ability.
- multi_accept on – You can utilize multi_accept in order for a worker to accept all new connections at one time
Keepalive Connections. Keepalive connections can have a major impact on performance by reducing the CPU and network overhead needed to open and close connections. NGINX terminates all client connections and creates separate and independent connections to the upstream servers. The following directives relate to client keepalives:
- keepalive_requests – The number of requests a client can make over a single keepalive connection. The default is 100, but a much higher value can be especially useful for testing with a load-generation tool or getting a high number of requests from individual instances
- keepalive_timeout – How long an idle keepalive connection remains open.
The following directive relates to upstream keepalives:
- keepalive – The number of idle keepalive connections to an upstream server that remain open for each worker process. There is no default value.
To enable keepalive connections to upstream servers you must also include the following directives in the configuration:proxy_http_version 1.1; proxy_set_header Connection "";
Access Logging. Logging every request consumes both CPU and I/O cycles, and one way to reduce the impact is to enable access-log buffering. With buffering, instead of performing a separate write operation for each log entry, NGINX buffers a series of entries and writes them to the file together in a single operation.
To enable access-log buffering, include the buffer=size parameter to the access_log directive; NGINX writes the buffer contents to the log when the buffer reaches the size value.
Sendfile. The operating system’s sendfile() system call copies data from one file descriptor to another, often achieving zero-copy, which can speed up TCP data transfers. To enable NGINX to use it, include the sendfile directive in the http context or a server or location context.
Limits. You can set various limits that help prevent clients from consuming too many resources, which can adversely the performance of your system as well as user experience and security. The following are some of the relevant directives:
- limit_conn and limit_conn_zone – Limit the number of client connections NGINX accepts, for example from a single IP address
- limit_rate – Limits the rate at which responses are transmitted to a client, per connection (so clients that open multiple connections can consume this amount of bandwidth for each connection). This helps ensuring more even quality for all clients
- limit_req and limit_req_zone – Limit the rate of requests being processed by NGINX, which has the same benefits as setting limit_rate. They can also improve security, especially for login pages, by limiting the request rate to a value reasonable for human users but too slow for programs (such as bots in a DDoS attack)
- max_conns parameter to the server directive in an upstream configuration block – Sets the maximum number of simultaneous connections accepted by a server in an upstream group
Some additional features worth of mentioning include caching and compression. These are not really related to tuning and performance optimization but just good to consider.. 🙂
Caching. By enabling caching on an NGINX instance that is load balancing a set of web or application servers, you can dramatically improve the response time to clients while at the same time dramatically reducing the load on the backend servers. For instructions on how to do that, please check the NGINX Content Caching guidance.
Some quick tips I would like to still share re: static content serving, if any exists in your Node app web server.. This means that if your site serves static assets (such as CSS/JavaScript/images), NGINX can cache these files for a short period of time. An example of this configuration would be following: tell NGINX to cache 1000 files for 60 seconds, excluding any files that haven’t been accessed in 20 seconds, and only files that have 5 times or more uses. Example:
open_file_cache max=1000 inactive=20s;
open_file_cache_valid 30s;
open_file_cache_min_uses 5;
open_file_cache_errors off;
Caching can also be done based on location, such as in following example:
location ~* .(woff|eot|ttf|svg|mp4|webm|jpg|jpeg|png|gif|ico|css|js)$ {
  expires 365d;
}
Compression. Compressing responses sent to clients can greatly reduce their size, so they use less network bandwidth. However, because compressing uses CPU resources, you should only use it when needed and only for objects that are not already compressed.
That’s it for the blog article, part 2.. In the next article, part 3, I’ll go through considerations when using scalable cloud infrastructure, IaaS, services in running Node applications with examples from Google Cloud.